Passive strategies to make money with online courses
I’ve got three strategies to sell a course, each of which I’ve used and that make thousands a month. If you’ve ever thought about creating a course online to make money, these are the strategies you need to know.
The fact is that creating a course just isn’t enough. In fact, creating an amazing online course isn’t enough. There are just so many courses available, we see so many sales pitches every day, that people just don’t buy courses anymore.
To make money on a course, you need an amazing marketing strategy to go with your amazing course.
That’s where this post comes in. I’m sharing the three strategies I’ve used to sell my online course, strategies I learned from other bloggers that have used them to sell hundreds of thousands in their own courses.
Best yet, once you set these strategies up, they’ll produce passive income every single month.
We’re building a huge community of people ready to beat debt, make more money and make their money work for them. Subscribe and join the community to create the financial future you deserve. It’s free and you’ll never miss a video.
Join the Let’s Talk Money community on YouTube!
What Nobody Tells You about Selling a Course
If you’re just joining our three-part create a course series, we’ve covered why everyone should be developing an online class…because who couldn’t use an extra fifty grand a year. I also took you step-by-step to making a course in our last video.
Check out the first video to learn how much courses make
Watch the second video for a step-by-step on creating your course
Anyone that’s every developed a course though knows we’re still missing the biggest step, marketing your class.
It sucks that you can’t just create an awesome course that helps people. There are so many courses, workshops and everything else out there, you absolutely must have a marketing plan to get yours in front of people.
That’s what we’re going to do in this video. I’m going to show you three sales strategies from launching your course to getting other people to sell it for you with affiliates. I’ll show you the strategies I’ve used to turn my first course into a three thousand a month passive income stream in just a few months and I’ll show you how to automate everything.
It’s all part of that three-video series to making a course and making money. I’m going to show you how to get your course in front of people and automate the process so it’s completely passive. Don’t forget to grab your free checklist to the entire process. Not only will it give you an easy list to follow but I’ll also give you a bonus report, the 10 Critical Steps to Creating and Making Money on a Course.
Download your free checklist to the Create a Course Series
Launching an Online Course
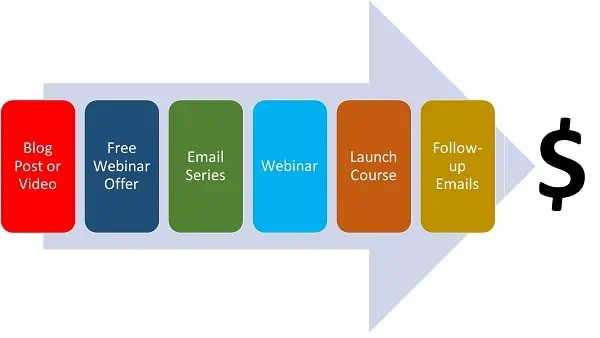
So the first strategy we’ll talk about here is going to be your launch and we’re not talking about any kind of launch but a launch funnel. Through this launch funnel, we’re going to be creating a passive income system you can replay every month or whenever you want to make extra money.
Now a launch is going to be that big event for your course but this doesn’t have to be a one-and-done kind of thing. A lot of course creators will do a launch, get a lot of sales, and then wonder why they never get anything after that.
Instead, what we’re going to be setting up is a launch funnel you can automate and run regularly to get those big weeks of signups.
These work great and will make you a lot of money for two reasons. One is that you’re building excitement for that launch week. You’re teasing on social media and making people wait. Then that launch week gives them a sense of urgency. You can get this course but this price and bonuses are only available for a few days. It’s a great way to build those emotional triggers into your sales strategy.
Before I show you the process here, you’re going to want to do two types of launches. First is going to be your Beta launch. This is like a trial run where you make sure everything is working, you get feedback on your funnel and course and then you fine-tune everything.
This post will take you step-by-step through the three marketing strategies I use to sell a course but there are a few resources you’ll need. I’ve listed the Resources I use below but basically you’ll need an email provider, webinar service and a platform to host your course.
- EverWebinar to create recorded webinars that look live. Try Everwebinar for 60 days for just $1 with this offer
- Host your course for free on Teachable
- Don’t wait to start building your email list! Try Convertkit for 14-days Free
How to Beta Launch a Course
For that beta launch, and this is something you only do once, you reach out to your email subscribers and everyone you know on social media for a private launch. This is like a members-only event and you’re offering a big discount and special one-on-one access. This special personalized access is something you offer as a bonus but you also want to do it so you can get feedback from all your beta group.
After that beta launch, then all your launches will be a regular launch. So you’ve used the feedback from your beta to revise your launch funnel, that automated system we’ll talk about, and you use that every month or every time you want to make that money.
So let’s set up your launch funnel and the strategy you’ll use and this applies to each time you want to launch your course.
Here’s the general process and then we’ll go step-by-step into each. First you build excitement for the course and your big launch, so over a couple of weeks you do some blog posts, videos or maybe some guest posting on other blogs. These are all going to promote a free webinar, maybe a live Q & A or just a presentation you give that’s related to your course topic.
So in each of these blog posts or videos, people will find a link to sign up for that webinar. That link is going to take them to a page that they can enter their name and email to reserve their spot for the webinar. That will put them on a special email list and will send them out three emails before the webinar.
In these, you’re warming them up, letting them get to know you and talking up this problem that your course is ultimately going to solve. Now the webinar is solid information, something that really helps people, but it’s also going to be your course pitch. Towards the middle and again at the end, you offer a special promotion for the course that’s only available during your launch which happens immediately and ends in a couple of days.
After the webinar, everyone on that list is going to get three more emails reviewing the webinar, talking up that problem and reminding people about that special course offer.
I know this seems like a long process but remember, once you have this set up and fine-tuned, I’m going to show you how to automate it. So really, you only have to do this once and it will make money for you every time you pull the trigger on that launch.
How to Create a Landing Page for a Course
So first you’re going to build out your launch assets. You’ll need a landing page where people can sign up for that webinar, an email series, and maybe a couple of posts or videos. The landing page doesn’t have to be long or detailed. In fact, the one I showed there is almost all template you can use if you use the EverWebinar platform for your webinar. You can also create your own landing pages for a little more marketing but these don’t need to be long either.
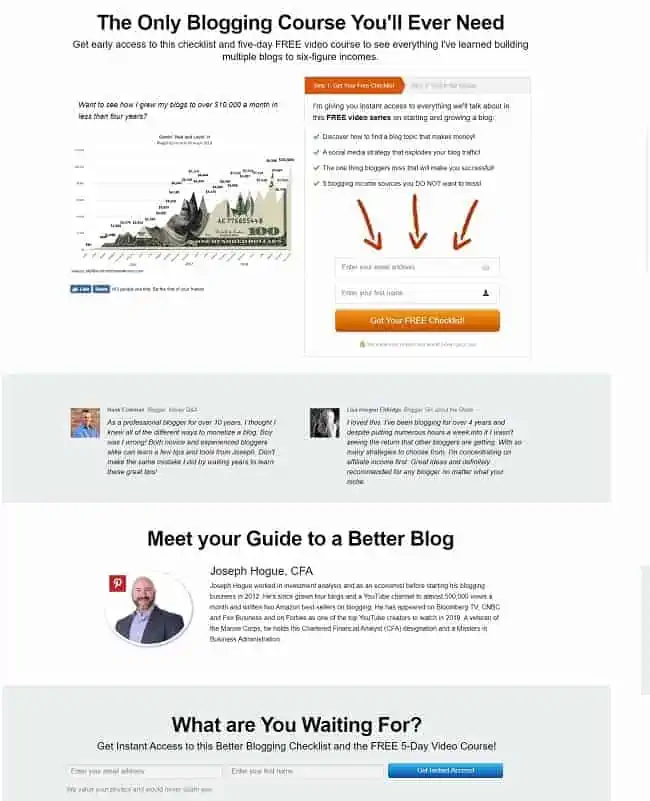
You’ll connect that landing page up to an email provider or your webinar platform so you’ll capture those signups for your email list. I’m going to show you exactly how to do this with a screenshare and how to automate your email series for max sales in our third strategy we’ll cover later in the video.
So you’ve got people in your email list with that free webinar offer, now you need six emails to send them. Three will go out before the webinar and three afterwards.
The first email goes out immediately when they sign up and I just talk briefly about the problem that the webinar solves, why they need to watch. It includes a link to the webinar, the date and a password if they need it.
The second email goes out a day before the webinar as a reminder and here I go into a little more about my story and why the webinar is so important. This really goes to building your credibility and that sense of importance for the webinar.
Finally, that third email is going to go out the day of the webinar. You can make this a story-email to build that relationship further or something shorter just reminding them the webinar is about to start.
So you give your webinar and I’ll show you exactly how to set that up and make it easy next. In it, you’ll provide that quality information for the smaller or related problem but then you’re also going to lead in to a bigger problem that your course solves or a related need.
Towards the middle of the webinar, you start to hint at a special course launch and discounts then you take five minutes towards the end to pitch your course, the discount and bonuses you’re giving away with the launch. You also make sure to stress that urgency by making those discounts and bonuses only available during the three- or five-day launch. You can even have the freebies expire at different times like by the end of the first day.
An Email Series to Sell Courses
Then after your webinar, your second set of three emails will go out to reinforce the need for the course and promote those special launch offers.
The first post-webinar email goes out immediately after the webinar is finished and talks up the special opportunity people get by signing up quickly. Maybe you offer some bonuses or extras if they sign up by the end of the day or I’ve even seen these expire within an hour. Really create some urgency here.
For the second email, this one goes out a day or two after the webinar, I like to give people a best-of outline of the webinar. This is to remind them of that value you provided, legitimately trying to help them whether they end up buying the course or not. Now of course, you’re going to stress the value in the course as well and talk about those special launch offers.
The last email goes out the last day those launch offers are available. Short and sweet and really driving home that sense of urgency. You want to stress that this is a last chance opportunity and something you don’t offer all the time.
From experience and talking with other course creators, you’ll get about a third of your course sales that first day of the webinar. These are the people that really want your course and those first-day. Then you’ll get a few more over the next couple of days but you’ll usually get 60% of your sales on that last day of the launch. This is why that sense of urgency is so important. Even if it’s a great deal, people just don’t buy without it.
So you’ve got your course launch funnel set up, and I’ll show you how to automate your signups and emails it later in the video, but now I want to show you how to set up the webinar to make it easy and automatic.
For this, we’re going to be using a tool called Everwebinar. This is what I use for my course and it’s great for making your webinars look live and using the replay anytime you want to do a launch.
With Everwebinar, you’re going to give your webinar once and the platform will record it. You can even record and edit a webinar so it looks polished and then upload it to the platform.
Here you’ll say when you want the webinar to be available and whether a replay is available. You can schedule it to be available at regular times and even to blackout holidays or weekends, days when people wouldn’t expect a live webinar to be available.
Next you set up the registration page we looked at earlier with one of the templates so it’s basically just enter your name and you’re done. One great feature here is that you can test your sign-up forms so some people see one and others see another form.
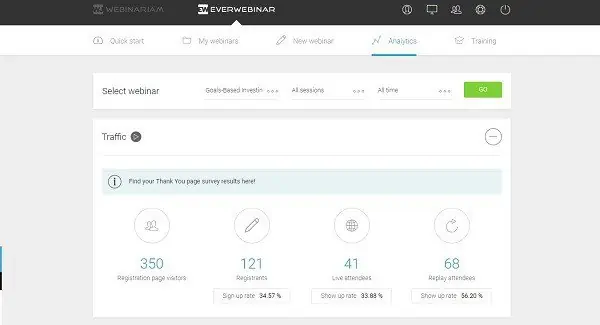
Then the platform will tell you which is getting more signups, so it’s an easy way to test and make sure you’re getting the most signups.
You then connect Everwebinar to your email service, I’m using ConvertKit here, to automate your email series. We’ll go into this more later but this is how you get those emails to send out at specific times to everyone that attended your webinar.
This next page here is where you can make your recorded webinar look live with some really neat options. You can add surveys or questions into your webinar. You add these chat lines so they show up at specific times, just as they would in a live webinar. You can even adds some links to product promotions, so offer the link to your course sales page in your webinar.
Besides being able to easily set up and automate these webinars, the platform is going to give you all the analytics you need to make sure your webinar is effective. You’ll see how many registers are attending, how long they stay in the webinar, as well as names, email addresses and lots of other detail.

That’s the process for getting your webinar online and I know a lot of you are freaking out about giving a webinar but honestly, it’s easier than you think.
First of all, if you’ve created a course on the topic, figuring out what to say is a cinch. Your webinar and course are going to be in related topics, fulfill similar needs but are going to be complimentary. Basically you want people to get quality information out of your webinar, be able to solve a problem, but take the course to get a more detailed view or really handle something from start-to-finish.
Within your webinar, you first want to set up that problem or those pain points that your target market feels. Then you introduce yourself, set up your credibility in the subject. You don’t need a PhD here, just talk up your experience and your personal story.
Remember, people buy the experience. They relate to your journey, they get inspired and they want that experience for themselves. That’s a selling point anyone can use and you don’t need to be the most respected leader in the topic. Telling your story is also going to set up a little drama, one person’s experience with the problem, that turning point and the transformation.
I’m telling you, this is such a powerful system if you use it and you will make money on your course.
Next, you get into your main webinar material, so the actual information you want to give people to solve that need you’re highlighting in the webinar. Within this, about half way through, you start relating that need or problem to the one your course solves. So you’re not even talking about the course here, you’re just setting it up with a problem the audience has and maybe hint that you’ve got a special offer at the end of the webinar.
Then once you’ve delivered that valuable information in the webinar, you come back to that larger problem or need and talk about how your course solves it. You talk about the bonus offers for the launch, that time urgency that the launch is only for a few days and really drive home the offer.
Now with this launch strategy to selling a course, you’re going to get those big bursts of sales but it’s only going to be for a week at a time. That sense of urgency you create with the launch is a great motivator and I like the system but you won’t see the consistency in sales you get from the buyer funnel we’ll talk about as our third passive income strategy.
That doesn’t mean you can’t use both strategies. Maybe use the buyer funnel strategy to sell your course, have that turned on all the time, and then maybe do a special launch every few months to get that burst of sales.
Selling a Course with Affiliate Marketing
Our next passive income strategy, and this is the best for beginners that don’t have a big reach of their own, is through affiliate marketing.
Now we’ve talked about using affiliate marketing to get a commission on products you promote but this is the other side of that. In that strategy, you get a website link to a product and then promote that product on your blog or channel. If someone clicks on the link and makes a purchase, you get a commission. Here, you’ve got the product and you’re offering a commission to anyone that brings you a sale.
Setting this up is easy and you can actually do it right in Teachable, so the same platform you use to host your course. Within your course dashboard, you’ll click on Users then Affiliates and then this button to Add an Affiliate.
Then you fill out the person’s name and email and what commission percentage of the course cost you want to offer. Most affiliate programs pay out between 30% to 40% of the sale. I like to offer 50% on my courses because I want affiliates to be full partners in promoting the course.
After this, you’ll get a link you can send your affiliate that they’ll use to promote your course. Anytime someone clicks on that link and buys your course, you’ll get the sale and your affiliate will get their commission.
Just like we talked about in affiliate marketing though, it’s not enough to sign up affiliates and expect them to sell your online course. If they’re just dropping the link in a post, they’re going to need massive traffic to generate those sales.
Instead, you need to work with your affiliates to produce interesting and engaging content. This means getting your affiliates to be proactive in creating those buyer funnels themselves to promote the course.
Besides asking if they’ll set up buyer funnels on their end, there are a few other ways you can work with affiliates to sell courses so both of you make more money.
You can do guest posts on their blog, writing up a detailed article and talking about the course. These are great because they take less than an hour to write and help to build your name recognition and that need for the course. You can also do video interviews with the affiliate, where they introduce you and ask questions. These are even faster to produce and benefit from that face-to-face connection. You can also work with your affiliates to promote your launch webinar, so something extra to offer their audience.
This is probably the easiest of the three strategies to sell a course but of course comes with the downside that you have to split your sales with someone. Still, working with affiliates can mean huge sales and it’s maybe an audience you wouldn’t find with the other two strategies anyway.
Creating a Funnel to Sell an Online Course
Our third marketing strategy to sell a course is going to be setting up buyer funnels. Now this is going to be different from that launch funnel idea. In the launch funnel, you set everything up to run at a specific date, so you built up some excitement every couple of months and then had a big launch.
These buyer funnels are set up to run continuously. Since you aren’t taking the time to build excitement, you won’t get those big bursts of signups but it’s happening all month long so you can still get the same or even more total sales.
The buyer funnel strategy is similar so you’ll create a few blog posts or videos around your course topic.
For example if my course was about investing in dividend stocks, maybe I would do a few videos on why everyone should start investing and how dividend stocks beat the market. Within each of these, I would offer a freebie called a lead magnet. This is just going to be a short checklist or handout that gives people more information but they have to sign up for it.
The link in each post takes them to a landing page with an email signup to download their free report and that puts them on those special email lists like we talked about in our launch funnel. The difference here is that this series is just three emails, each talks a little about one of the blog posts or videos.
These funnels are all about developing that relationship with the reader, moving them through the decision-making process until they’re ready to buy and being there when they do. In each of those blog posts and emails, maybe you talk a little about your course and how it solves that need.
We talk about a buyer funnel with this strategy and I want to share this graphic because it’s helpful to imagine that idea and the buying decision people go through with anything they purchase.

You first have to understand or realize there’s a problem, then you get interested in a solution and start looking for options. Finally and only after these first two steps do you start evaluating different products or companies.
It’s only after all of this, and this happens in every decision you make big or small, but it’s only after this that you make a purchase. So with this funnel system for your course, we’re guiding people through that funnel. Instead of just talking about a problem and hoping they come back to our blog after doing that evaluation, we’re keeping control of every step.
So I want to guide you through a few of the steps here, especially the ones that are different from our launch strategy or setting up your emails to automate the process.
In this sales strategy, instead of offering that free webinar as an incentive, we’re offering a free handout. This lead magnet is a handout or checklist you offer that readers need to sign up for by giving you their name and email address.
It’s important that the freebie appeals to a wide audience so go with something more general than your course topic. That way, you get more people signing up and get more people into your funnel. Within each of your blog posts or videos, you’re going to reference this freebie and provide a link for people to follow.
Just like in our launch strategy, that link leads to a landing page and an email form. Downloading the freebie gets people into our email series to keep them in that funnel, building that relationship and guiding them through the decision.
Now let’s talk about how to set up your emails so they go out automatically when someone signs up, so they go out at specific times and help you make that sale.
I’ve used three email providers; MailChimp, Constant Contact and AWeber before I finally got to the one I use now. None of them offered the features I needed to really make this funnel work and all lacked something.
I use ConvertKit now because, not only is it an inexpensive tool, but it’s super easy to set up my affiliate funnels and makes everything automated.
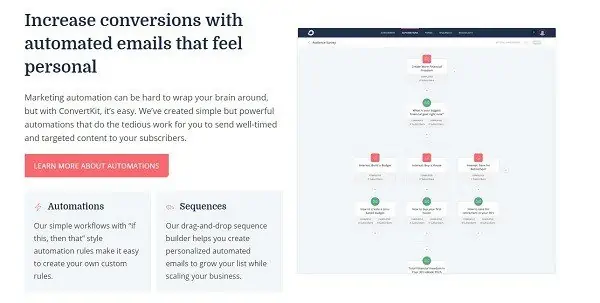
Setting up your email sequence is really easy, and you can use this to sell your course or to sell affiliate products to get a commission so it’s a great money making tool.
In each email, you can choose the delay for when it goes out. I like to send the first email out immediately, so when everything is still fresh in the receiver’s mind, and then send each of the following emails out one day after the other. Since we’re only talking about two or three emails, it’s not something that’s going to get annoying because we’re only talking about a few days.
You can enter your subject line and any of the content in the editor here. On the left side, you’ll be able to add as many emails as you want in the sequence. We’re only doing three emails here but I’ve got sequences of up to 12 or 15 emails for general blog visitors. They go out once a week pointing out old blog posts and really just building that relationship with the reader.
So you type out your emails for each blog post or video. You want to include a personal story or some kind of story or anecdote to make that connection with the reader, something to help them relate to the problem.
Remember, the email series is meant to guide them through this decision-making process so you want the first email to be about the first blog post and make it a progression until the last email is about the affiliate and that last post or video.
Within each email, you want to link the blog post a couple of times. So I’ll usually do that early in the email and then again towards the bottom, just to give them a couple of chances to click on it. You click this little link icon and then add the URL address to your post or video. Then there are a few options here. You can make it so when they click, it opens up a new window which is nice if they want to come back to the email. You can also tag anyone that clicks on this link which puts them in a special group in ConvertKit.
This is a great way to customize your email list, putting people in groups according to what links they’ve clicked so you know exactly what people are interested in and what they’ll respond to best.
Before you move on to the next email, you can move this one from draft to publish so it’s live and then do the same for your other emails. Finally you click save all and your email sequence is ready to go.
Now the only step left is to tell ConvertKit who to deliver this email sequence to by connecting the form you set up with the emails. So you click on Automation up top in the menu and New Automation. Then you want to say anytime someone signs up to this form, so you select joins a form and then find your form here in the dropdown. Then click on add action for what you want to happen and select this email sequence, find the sequence in the dropdown here and click add action.
There are a lot of other options here to segment your email lists, really customize the path for each person that comes to your blog, so it’s a great tool to have. This just allows you to give each person that personalized feeling and they’re going to be a more engaged subscriber.
One last note on the automation here, make sure you go up here to turn on the automation. It’s one of those little things you can forget so just double-check.
Once your email sequence is live and delivering to people, you can always go back in to make changes or check on how well it’s doing. The reporting in ConvertKit makes it easy to see how many are opening your emails and clicking on links. You can even re-engage with people that didn’t open an email so you make sure you reach as many as possible.
I’ve seen people include a free webinar in this buyer funnel as well but I think it might be overkill at this point. It works in that course launch strategy but you don’t need it here because you have that lead magnet instead. There’s just a point where you’re overloading people with too much information so you need to cut some stuff out and get to that sales pitch.
This buyer funnel will run continuously. Anytime someone visits those blog posts or videos, a percentage will sign up to download the lead magnet and will get the emails. Then a certain number of those will end up buying your course and this is the fun part because you’ll just get emails from Teachable that you got another sale. You’ll forget that your funnel is running and just keep making money.
Now you’ve got a complete picture on creating an online course and turning it into passive income but I realize it’s a lot to take in. That’s why I created that easy checklist of everything we’ve covered so make sure you click here to download the free checklist and that special report on the 10 critical steps to making money on a course. They’re both free just click through the link below.
