
Don’t miss an opportunity to boost your YouTube video before it even goes live with these tips on uploading
Uploading a video to YouTube is deceptively simple but the basic process misses out on some of the most effective ways of making your channel a success.
Besides the ability to ‘tell’ the world’s second-largest search engine what your video is about, the upload process is your opportunity to hook viewers and get them to do exactly what you want.
The upload process is definitely part of that professional side of managing a YouTube channel, the part that isn’t immediately clear until you put in the time to really understand how the business works.
Spending your time here, researching and understanding how to use the process effectively, will be that extra push you need to see fast channel growth.
Let’s look at the basics of uploading a video to YouTube before getting into the details that matter.
Click to reserve your spot at the FREE YouTube Quick-start Webinar! I’m sharing three strategies that helped me grow my YouTube channel and double my business income. I guarantee they WILL work for you. Seats are limited for the webinar, so make sure you reserve yours.
Create your account on TubeBuddy for free to see the features that will help grow your channel!
How to Upload a Video to YouTube
Spend any time watching cat videos on YouTube and you’ll realize that uploading a video is (almost) too easy.
Click the plus icon in upper-right menu to upload a video. You’ll have the option to upload as public, unlisted, private or scheduled.
- Uploading a video as public will publish it immediately
- Unlisted videos are only available to viewers with the URL link
- Private videos are only available to viewers you invite to watch, with a maximum of 50 invites
- Scheduled videos become public on the scheduled day and time
Once you choose how to upload your video, you’ll see the main video creation page below. There are four important parts here plus the scheduling section we’ll detail in the chapter.

YouTube accepts most of the common video formats including mp4, mov, avi, wmv and FLV. If you get an error message uploading, try using free conversion software like Handbrake to convert into mp4.
Longer video files can take a while to upload and process. A 15-minute mp4 file will take over half an hour to upload. You’ll need to keep the browser tab open while it’s uploading but you can open other internet tabs while you wait.
We’ll talk about four main parts of the upload screen [title, description, tags, thumbnails] in separate sections below.
Once you’re video is uploaded, you’ll have the option of adding closed captioning, cards and an end screen.
Adding Closed Captioning to Your Videos is important for a couple of reasons. About one-in-twenty people have issues with hearing loss so adding captions will allow you to serve this community. There are also those that choose to use captioning if they’re watching at work or somewhere the sound would be distracting. I generally see about 8% of my viewers using closed captioning.
Closed captions are also another way to tell YouTube what your video is about and help it to rank in search. The platform creates its own set of captions but seems to not trust these enough to use for search discovery.
If you script out your videos and use a teleprompter, captioning is easy because you can just copy-paste your text into the captions box.
- On the video information screen, click to Subtitles/CC
- Click to Add New Subtitles and select the language
- Choose Transcribe and auto-sync
- Paste your text in the box or type your captions
- It will take an hour or more for YouTube to sync up the text and audio, then click back through and approve the captions
You can also hire a service like Rev.com to transcribe your videos. The service charges a dollar per minute which can add up for new creators.
We’ll talk about scripting and using a teleprompter throughout the book and this is another one of the benefits. There’s a learning curve to making a prompted video look natural, and I’m not sure I’ve got it down yet, but the pros definitely outweigh the cons. Besides being able to easily add captions to a video, scripting out my videos and reading from the prompter cuts editing time in half.
Adding Cards to Your Video takes less than two minutes and will help to keep people watching your channel.
Cards are the notifications you see appear in the upper-right of the video, prompting a viewer to watch another video or do something else. There are five types of cards you can add:
- Promote another video or playlist. I like to prompt playlists instead of individual videos because they lead to longer watch-time.
- Promote another channel. This can be helpful if you’re doing a collab with another creator.
- Feature a non-profit for a donation.
- Ask viewers to participate in a poll. I’ll have to admit, I rarely see this one used though it sounds like an excellent way to get info on your viewers and increase engagement.
- Link to an approved website. This includes your associated website, a merchandise site or a crowdfunding platform.

I recommend adding at least two cards in each video. I add my first card right around the 50% point of the length, the average duration for most of my videos. The idea is that it keeps people watching distraction-free for as long as possible but gives them something to click when their attention starts dropping.
Adding End Screens to Your YouTube videos is another easy process and another way to keep people on your channel.
An end screen is the last 10 – 20 seconds of video where you can prompt viewers to watch specific videos next or include your subscribe call-to-action. YouTube makes this easy by showing end screen elements at fixed points on the screen.
The easiest way to add an end screen is to use one of the templates provided by YouTube by clicking Use Template. You’ll be shown a selection of formats with video boxes or a subscribe prompt at different points on the screen.

If you know which template you’ll be using, you can edit your video to include text callouts pointing to the elements. For example, just above the Subscribe element on my end screen template, I ask people to click with an arrow pointing to the image.
You’re given a choice of prompting viewers to watch your most recent upload, a selected video or playlist, or allowing YouTube to pick the video most appropriate to a viewer’s history.
- I always select Most Recent Upload for the first video element shown. This helps to send as much traffic as possible to your newest video to give it that critical watch-time push during those first two days.
- I used to trust that YouTube knew my viewers better than I and would select Best for Viewer for the second video element. Instead, I’ve switched to adding a playlist here because they usually translate into greater watch-time per viewer.
It’s important to be talking and providing content through your end screen. Ending the informational part of the video tells viewers there’s nothing left and they’ll be easily distracted by suggested videos and other content. Instead, keep them focused on your video while you prompt them to click through on the end screen itself.
You can adjust the timing of your end screen elements up to 20 seconds of your video.
Scheduling Your YouTube Videos
I’ve talked to creators that have hundreds of thousands of subscribers that are still publishing their videos immediately after uploading. They might have a specific day and time they like to publish each week but they wait until the last minute to get their videos done.
That just sounds exhausting to me and one unexpected delay can cause them to disappoint their community.
I know it’s tough getting videos done weeks in advance but once you’re scheduled ahead, it takes no extra effort to stay out ahead. As long as you keep producing the same number of videos each week that you publish, you’ll always be scheduled in advance and will never have to worry about not being ready with a video.
Think about it this way, if Seinfeld didn’t have an episode ready for Must See Thursday…how happy do you think NBC would be?
A professional channel means having a video ready for the same day and time each week, optimally for several days per week. The only way you can do this reliably is to work at least a couple of weeks in advance and schedule your videos.
Uploading a video to YouTube will become routine quickly. The basic process is so simple that it can be easy to mindlessly zoom through it.
Resist that temptation!
Put just as much time into researching the metadata and points below as you do producing your videos. Do it for every single video and you’ll see growth like you wouldn’t believe!
Video Metadata for YouTube Success
While some of the parts of uploading like the description and tags are evident in the process, their importance isn’t nearly as obvious and the basic upload process misses a huge chance to take your videos farther.
This opportunity is centered around something called metadata…sorry, couldn’t resist a nerd word.
Metadata is just data (information) that describes other data. In this case, metadata is things that describe what your video is about.
That’s important because YouTube isn’t a person. The platform can’t watch your video and say, “OK, this video is about paying off debt. I’ll rank it with these videos about debt.” While YouTube and its parent-company Google are masters at understanding content, it still needs help at times and it never hurts to nudge it in the direction you want.
In fact, there’s evidence that metadata on a video (especially the tags, title and description) are even more important during the first week. It’s in this period that YouTube doesn’t have a lot of its own data on how viewers react to the video so it uses your metadata to help rank it quickly in the relevant topics.
We actually covered some of this metadata information in the chapter on Finding Video Ideas for YouTube. This metadata information like keywords (tags) and title are so important that you need to do this research before scripting and producing the video.
Knowing what keywords you’ll be targeting in your video before you produce it will help create something that sounds natural instead of stuffed with unrelated concepts.
*An important note about metadata for your YouTube videos. Think long and hard about changing the metadata to a video after it’s been published and NEVER change the metadata on a video that is performing well.
When your video is published, YouTube begins to measure how well it performs on views and watch-time for the keywords used. This is how your video ranks for search and suggested videos on YouTube. If you change the metadata, it resets everything and YouTube has to relearn how appropriate the metadata is for the video.
That’s not to say you should never change metadata after a video is published. If it’s been more than six months and the video is doing nothing then refocusing the keywords and rewriting the description might give it new life.

How to Pick Your YouTube Video Tags
Any old school blogger remembers the days you could just stuff an article with a keyword to rank on Google. Bloggers would even group keywords in a list in a jumbled paragraph of words to rank.
It started that way on YouTube as well, where you could just stuff your keywords into the description and tag field to rank…ah the glory days of easy traffic.
Sadly [or fortunately, depending on how you look at it] that’s no longer the case. The tag field on your video upload isn’t as important as it once was but the research you’ll do to find the best tags is still extremely important.
A new channel cannot hope to rank for the most competitive keywords. You can tag and use the keywords in your description all you want but you probably aren’t showing up anywhere near the top 20 for a keyword like ‘making money online’.
Instead, you go further out into niche ideas like ‘making money as a teenager’. Better to rank a video in the top five for a lower-traffic keyword than buried in the 50th position for a high-traffic one.
So your keyword research can start with a core topic, a popular idea and based on a high-traffic keyword, but then you branch out into niche ideas around that topic. This is going to uncover smaller keywords you can use in your description and tag fields. You can also develop a content strategy around this, producing individual videos around each keyword in the group.
- Smaller channels, under 25K subscribers, should aim for keywords that get between 100 to 1,000 monthly searches on YouTube. Remember, you can use the Keywords Everywhere Chrome extension to see monthly traffic.
- Start typing your core topic idea in search to see what is auto-populated by YouTube for niche ideas
- Use the alphabet-search method where you type your core topic keyword in search and then run through the alphabet, adding each letter to the end of your keyword to see what ideas auto-populate

Ideally, you want between 10 and 15 niche keywords related to your video. You’ll use these in your tag field and in the video description. One of these, the most relevant, will be your main keyword that you’ll target and will go in your title as well.
You can use up to 500 characters in your tag field, which can be a lot of keyword phrases. I don’t think you need to use all this space but try using at least 10 or so tags. These keyword phrases of three or four words need to all be related and relevant to your video so they help YouTube understand what it’s about.
Creating a Viral Video Title
I hate thumbnails and titles! I hate the idea that you can’t just create an excellent video and expect to get views. You also have to create an engaging title and a persuasive thumbnail or nobody will click through to see your amazing video.
Frustrating but that’s just how it is. Put in the time for each title and thumbnail and it’ll be time well spent.
Creating a great title is one-part art and two parts work. That’s a good thing for those of us that don’t consider themselves artistically-gifted because it means you don’t have to be Ernest Hemingway to create a great title, you just have to put in the work.
Let’s start with a few points and then I’ll share a free tool that can help with the process.
- Your title should include your main keyword or phrase. This is no longer as important in Google search but is still very much so in YouTube search and evidence shows titles with the keyword first do better than having it towards the end.
- Three types of titles do better than any others; lists, how-to and questions.
- Character length needs to be shorter, around 70 characters, but data shows that titles between 50 – 60 characters tend to perform best.
- You can include [ ] brackets to separate one part of the title from another part, for example “7 Passive Income Ideas [Proven $5K a Month]”
- Use words that spark emotions like fear, anxiety, happiness. For example works like blissful, terrifying or surprise.
- Use words that spark curiosity like “you won’t believe” or “you’ll be amazed”
Creating your best title isn’t about inspiration, it’s about brainstorming. It’s about spending at least 15 minutes writing out different ideas, searching on Google to get ideas, and then narrowing it down to the best one.
One tool I like to use for ideas is social tool CoSchedule. They’ve created a nice headline analyzer that grades your title ideas on a scale from 0 to 100. The tool looks for points like title length, emotion words, power words and other factors.
Understand that the headline analyzer isn’t a perfect title creator but it’s a useful tool to test out different ideas to see what gets a higher score. Use your own intuition as well to pick the title you end up using.
How to Write Your YouTube Video Description
I’m amazed at how little time creators spend on their video description. Even some large channels often put very little into the description besides a jumble of links.
Your video description is a great opportunity on several levels and it’s something that absolutely cannot be neglected.
Not only does your description help YouTube understand how and where to rank your videos, it also gives you the chance to make money, keep viewers on your channel longer and convert subscribers.
You’re allowed up to 5,000 characters in your video description, around 800 words, but you probably don’t need to use all of it. I aim for around 300 words to describe the video and then add a template section with subscribe links and other content which is around 150 words.
Some things to consider including in your description,
- A keyword-rich description of your video (duh). Use keywords from your tag research here and make it persuasive. Talk up what you’ll be sharing and why someone should watch the video. Make this at least a couple hundred words long or more.
- Consider adding something like a Table of Contents after your description, write out the time where each main point appears in the video (Example 1:23). This will keep people watching instead of getting bored and clicking out, plus it gives you another chance to include keyword-rich topics.
- Callout relevant videos and add a link to each. This is a great way to keep viewers on your channel, a huge signal to YouTube and one of the best ways to convert subscribers.
- Include a couple of relevant affiliate links. Not too many and only ones directly related to the content.
- Have a one- or two-sentence callout for why someone should subscribe and then add your subscribe link.
- Have a callout to any related link magnets for an email list.
Remember, YouTube is just a machine. It needs the user (YOU) to help it understand what a video is about through the metadata. HELP YouTube HELP You!
The first few lines of your video description will show up in search and are given extra weight by YouTube so make sure you include your most important keyword here as well as something persuasive to get viewers to click through.
A note about links that take people off YouTube. Like any social platform, YouTube doesn’t like when you send people away from the site. Viewers clicking off YouTube from your videos can hurt your search ranking while viewers staying on the platform after your vids help it.
That doesn’t mean you should never add a link that points off-YouTube. Making money through affiliate links and adding people to your email list are good reasons but within reason. Affiliate links should be highly-relevant to the video content.
It’s up to you what you include in your video description but I’ve seen some pretty weird stuff you might want to avoid including:
- A long clickable list of video equipment you use– are your viewers REALLY that interested in it and is the pennies you make on Amazon worth hurting your video by sending them off YouTube?
- Random affiliates that don’t relate to the video. YouTube sees an off-site link even if your viewers aren’t clicking on it so this might be hurting you more than helping.
- Too many social media links. This one is debatable. You should be trying to build a community on other platforms but make sure you’re really using those platforms if you’re going to be taking viewers off YouTube.
How to Create a YouTube Video Thumbnail
Thumbnails and titles are extremely frustrating…have I said that yet?
The flip-side to the importance of your thumbnail and title is that, if you get good at creating these, they can draw in more people than you’d imagine. I’ve heard of creators literally spending hours on a title an thumbnail for each video. That seems like a bit much but any time you spend learning how to create a great thumbnail will be well spent.
Let’s look at some thumbnail basics and then I’ll share my process.
A profile pic, an image of your face, is a critical part of your thumbnail. New videos will go out to your subscribers in their feed first and it’s these first interactions that tell YouTube whether to show the video to more people. Since your subscribers know you, they’re more likely to click on your thumbnail if it includes your face.
In fact, I’ve put other people’s images on my thumbnails before [people much more popular and well-known than I] and have seen the videos get lower than normal views. Subscribers may or may not recognize someone else so it’s always best to put your image on the thumbnail.
I’ll detail an easy way to make profile pics for your thumbs later but they should include expressive emotions like surprise, shock and happiness. Your profile pic should also be fairly large, taking up at least a quarter or a third of the thumbnail. Remember, most people are going to be seeing it on a small screen.

I like to add a few words on the thumbnail though I know creators that do well with no text at all. The idea is to create interest or a question in the mind of a potential viewer. Your thumbnail should tell a story that complements the video title.
For example, in the thumbnail above about warning signs to a dividend cut, I have knives in the background image and use language that evokes fear and uncertainty. I might have been able to do this without the text but I like adding a couple of words on each thumbnail.
If you do decide to add text to your thumbnails, I would strongly recommend adding no more than three to five words. Any more than that and it will be difficult to read on a smartphone and is just going to jumble up your thumbnail.
The recommended thumbnail size for uploading to YouTube is 1280×720 pixels but remember that most people will see yours on a smartphone. While creating your thumbnail, always decrease the size to 100×56 to see how it looks at the smaller size.
Designing your thumbnails, it helps to use a consistent text font and colors. This will help people recognize your videos when they’re scrolling quickly and helps to brand your channel.
Finally, the decision to use an image background or flat color background is a tough one. I like using images because it helps to tell a story about the video but they can also be distracting and make it difficult to read the text.
There are a lot of channels that use a flat background or some simple text graphics besides their profile pic for thumbnails. Check out the thumbnails on Nick Nimmin’s and Derral Eves’ channels for examples. I don’t think there is any ONE way to do it. My suggestion is to try it out on a few videos, using images and a flat background, to see which you like and which result in higher click-through.
I know a lot of people like to take a simple screenshot from their video to create a thumbnail. It’s a simple solution but I have a process that goes just a little further for a more professional result.
- Take lots of profile pics. This means standing in front of the camera [with the image from chest to head] and snapping pics in different poses and facial expressions.
- You can then use a site like ClippingMagic to cut out the images, creating PNG files you can use to layer your profile image on top of a thumbnail.
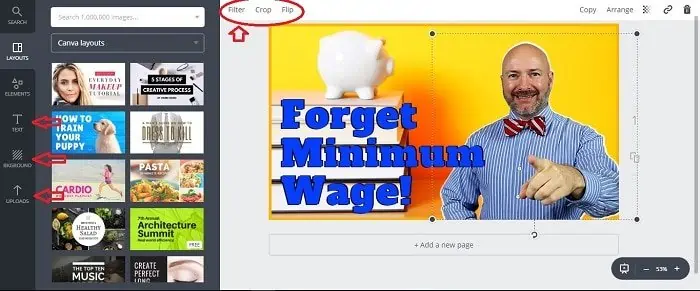
- Upload all your profile images to a site like Canva to create your thumbnails
- You can use Canva to create a flat colored background or grab background images from a site like DepositPhotos and upload to Canva
- Click ‘Arrange’ in the upper-right on Canva to layer images and text
- Click ‘Filter’ in the top left on Canva to change images, I like to increase the Saturation for background images to +20 to really bring out the colors
- I use the Alfa Slab One font for text to produce thick lettering that’s easy to read
- Copy your text and create another box with the letters in black to place behind but slightly to the left and lower for an outline effect. This really helps separate your text from the background.
- Adding my profile image, I copy-paste another image and increase the Contrast/Brightness to max in the Filter settings. Layering this behind my profile image creates a halo effect.
- In the Filter dropdown, I change the Contrast to +27 and the Blur to -27 on my profile pic. This makes the image really pop-out from the thumbnail.
It takes some experimenting but you’ll pick it up quickly and will be able to create your thumbnails within a few minutes once you’ve got an idea. As with everything here, this isn’t the ONLY way to do it but a process I’ve found that works and results in clickable thumbnails.
* An important note here, changing your thumbnail on a video doesn’t change the metadata like changing the title, tags or description. That means you can change your thumbnail, testing different ideas, without worrying about destroying the momentum for a video.
Some YouTube tools like TubeBuddy even have a built-in feature to test thumbnails simultaneously. I don’t use the feature but use TubeBuddy for keyword research and a lot of other solid benefits.
For thumbnail testing, I usually wait a few weeks and then look to videos getting below-average click-through. This usually means videos with a CTR below 3% for potential thumbnail problems.
I’ll record the CTR for the video, create a different thumbnail and replace it on YouTube. After a couple of weeks, I’ll look at the new CTR to decide either to keep the new thumb, replace it with another or just go back to the original thumbnail.
Uploading Your YouTube Video to a Playlist
Playlists are another important but often neglected part of your channel. Every time you add a video to a playlist, it creates a new URL that is a signal to YouTube. It’s almost like creating new content without having to do anything!
Every video should be in at least one playlist and can be in multiple playlists on your channel or on other creators’ channels. In fact, one of the easiest ways to collab with someone is just to add some of their videos to your playlists.
This doesn’t mean you have to add a video to a playlist immediately upon upload. I like to wait a week or more to add videos to playlists.
- Create a spreadsheet of video titles and the share link.
- Add a column to note in which playlists the video is included.
- Set a schedule to upload a video to a playlist on days when you don’t publish a new video.
- Try keeping playlists to no more than 10 videos and create new playlists as you go
This is the longest chapter by far in the book. That should give you an idea on how important it is to upload a YouTube video using metadata and other concepts to boost your views. These are the kinds of things that the majority of creators don’t know about or neglect altogether. Putting in the time to make your video standout will mean the difference between viral YouTube success and just another wannabe.