
The process to making an online course and making money
Online courses can make you thousands a month but you have to do it right and you have to know the process. That means learning how to create an online course people can’t resist and knowing the steps to finish your course once you start.
In this video, I’ll detail the six steps to developing an online class from getting ideas to getting online. You’ll learn everything you need to know including all the details you don’t hear about from Create a Course programs.
We’re building a huge community of people ready to beat debt, make more money and make their money work for them. Subscribe and join the community to create the financial future you deserve. It’s free and you’ll never miss a video.
Join the Let’s Talk Money community on YouTube!

Is It Easy to Make Money Creating and Selling Online Course?
If you don’t already know, making an online course is one of the best way to make money.
You can sell your courses for as low as $10 and you can end up earning thousands with just a few courses sold. This article will show you how to create, sell, market and deliver your online course with ease!
Download your FREE checklist to creating online courses
First thing’s first: What type of course should I create?
This is extremely important because once you decide on the course topic there are several things like production time, marketing efforts, revenue potential ect… that become much easier to calculate which will ultimately affect how long it takes before you see profits from your course. So what types of topics are hot right now? Here are some examples:
- Making money online
- Social media marketing
- Blogging
- Productivity tips & tricks etc…
Once you decide on the topic of your course it’s time to write an outline. Outlines are used by writers, directors and producers to keep their productions organized so they can stay on task without wasting valuable resources. The same goes for writing an online course, outlining will help you see exactly what you’re trying to accomplish with your content before investing thousands of dollars into development.
The next part is developing the production portion which varies depending on your budget but this tutorial will show you how to make a high quality course even if money is tight!
The trick with most online courses is getting your message in front of as many eyeballs as possible before competition gets too stiff. In other words, you need to get your first product out as fast as possible because most online courses don’t make any money until you release a second, third etc. course.
This is where building an email list comes into play! In this tutorial I’ll show you exactly how to build a list from scratch which will help exponentially with your future products and follow ups. Once the production process has been completed it’s time to market and sell!
How to Create an Online Course from Scratch
We saw in our last video how nearly half of the course creators on Teachable are making $50,000 or more a year and how I’ve booked almost $10,000 on my first course over the last four months.
We talked about those five biggest hurdles to creating an online course and the three keys to success and a lot of you asked, “OK so how do I create a course?”
That’s exactly what we’re going to do today. I’ll detail from start-to-finish from picking a course topic to getting it online and everything in-between. We’ll cover developing your idea, producing the content and everything you’ll need.
It’s all part of our three-video series to making a course and making money. In our next video, I’ll show you how to automate your marketing so you make money every single month. I’ll be releasing that video in the next few days but I’m leaving a free checklist to everything we’ll be talking about in the videos. Not only will it give you an easy list to follow but I’ll also give you a bonus report, the 10 Critical Steps to Creating and Making Money on a Course.
Download your FREE checklist to creating online courses
Finding a Topic for Your Online Course
Your first step in creating a course, and this is something we talked about a little in the last video, is picking a topic.
Start by just brainstorming a list of hobbies, interests and what you do for a living. Don’t worry about if something is popular or whether you think people want to learn it. We’ll get to that but what’s important here is finding something in which you already have some experience, personal stories and knowledge.
That idea of personal experience is important. It’s the stories about your own journey learning the topic that you’ll be able to share to help people relate. People don’t buy courses for that checklist of how to do something, they can get that anywhere online. People buy courses for that personal experience, to be inspired by your story and learn how to make it their own.
With this list, we can start vetting some of these ideas for popularity and getting ideas on how to develop the course. For this, there’s no better resource than Amazon and Udemy.
Udemy is an online course platform, not necessarily the one I recommend using and we’ll talk about that but a great one to research your own course. Clicking through to the site, you can browse categories here in the menu and see that it drops-down with a list of categories and topics on the right. It will even show you these popular topics within each so you can see what’s selling.
For the first time, I’m revealing the entire strategy I’ve used to self-publish 12 books on Amazon and average over $2,100 a month in passive income. In Self-Publishing for Passive Income, you’ll learn everything you need, from getting a book idea to making writing easy and selling more books.
You’ll also want to just type in some of your ideas here in the search. So if we search on how to invest, you get some suggestions. This is important for developing your course because it can give you some ideas on narrowing your topic to appeal more directly to a specific group so we see different investment types like stocks, options, real estate and even crypto.
If we click to search, you’ll see a bunch of classes offered and you can click through to see what other course creators are covering. You’ll see some marketing language which will be helpful in putting together your own marketing. Then if you scroll down to the course content here, you’ll not only see the topics but how the sections are laid out. Looking through a few of the courses available, you’re going to get a great idea of what you can talk about as well as what you might add.
You can do the same on Amazon, and this is the way I research for my self-publishing books, looking through the table of contents in books on the site. You might even buy a few books in the topic to brush up on your knowledge and get some new perspectives. Kindle books are usually less than ten bucks each so it’s a great way to research on the cheap.
Everyone has a book idea, and this is the best source of passive income I’ve ever found. Like many people, don’t give up on your self-publishing idea mid-way through. I’ll show you how to make it a reality and every trick I use to make monthly money! Click through for a coupon code and special launch price, 75% off the regular price on Self-Publishing for Passive Income!
Developing an Online Course
Once you’ve got your topic, it’s time to start developing the idea and what you want students to get out of the course.
There’s an important idea I’m going to talk about here that will be critical to making course creation easy. This is not only going to help make the process smoother but will help not get caught in that challenge of including too much.
What you want to do is start with the transformation, that’s the change you want to bring in your students. What exactly do you want them to be able to do when they finish your course?
What you’re going to do is work backwards from that transformation to know what you need to cover in the course. What do you need to show your students to get to that point?
Here you’ll also want to think about your target audience because that’s going to be a factor in what they need to know. For example, if I’m trying to teach someone how to pick value stocks, whether I’m trying to target beginner or advanced investors will have a big influence on what I need to teach them.
While you’re thinking about your target audience, start thinking about their pain points. Why do they want to achieve this transformation you’re promising, what are the problems they’re trying to solve.
This is going to be helpful not just in developing your course but when you put together your marketing materials and it might not be what you’re thinking.
A lot of times, these pain points or problems people are trying to solve are not the most obvious reasons. For example, investors aren’t necessarily trying to make those big returns. Instead, that underlying problem might be trying to achieve financial freedom or just the thrill of beating the market. So we’re talking about the deeper desires and needs to which your course speaks.
The last step here before we start outlining your course is to ask yourself if you can narrow the niche further. Your niche is that specific group that will find your course irresistible, that group of people you want to speak to directly.
For example, you wouldn’t want to create a course just about investing. It’s too broad, there’s too much you’d have to include and it really wouldn’t appeal to anyone directly. Instead, you might create a course about investing in penny stocks or even more niche, penny stocks of tech companies. You’re going to be able to include much more detail here, really make it a valuable course and anyone interested in that niche is going to be drawn like a magnet to your course.
If it applies, you can also niche into specific demographic groups by sex or generation. Even if the content isn’t necessarily different, you can still create that personalized feel by targeting your course to a very specific audience.
Now I know a lot of you are thinking, but won’t that limit how many people buy my course? If my course is Investing in Tech Penny Stocks for Millennials, doesn’t that miss out on a lot of other people that might want just a penny stocks course?
Let’s just look at an example. There are over 79 million Millennials in the U.S. alone and the term penny stocks is searched for over 135,000 times a month on Google. If we consider that Millennials are about 30% of the investing age population, then we get about 40,500 searches a month on Google by the group and interested in penny stocks.
Do not be afraid of defining your audience too narrowly. What you’re trying to do is to appeal specifically and personally to a group of people and you can’t do that if you’re trying to sell something to everyone.
Here you can begin outlining your course, actually writing out the steps from your transformation back to the beginning. A lot of this can come from what other creators and authors are talking about, so from your research, but you also want to add some steps of your own.
Also important are going to be including your personal experience, those stories of your journey into each chapter, each and every chapter. Include stories from your experience, examples from other people, any story where you can inject a little emotion and a little real-life narrative to the transformation.
Finally in developing your idea, go through each chapter to structure your course. This is going to mean what content types you’ll offer in each chapter, we’ll talk about that next, as well as what you want students to learn in each chapter or module.
Content Types for Online Courses
A big part of your course is going to be the different content types and how you use each.
Here we’re talking about different ways of delivering your course; so videos, text, audio, workbooks and checklists. Using the different content is important for a few reasons. First it makes your course more dynamic. You’re not just asking people to sit in front of a video for three hours. After watching a video, they can refresh with a brief handout, write out how the chapter applies to them with a workbook and even test their progress with a quiz.
This makes your course more engaging and interactive as well. One of the biggest problems with courses is student dropout and that leads to refunds. You need to keep your students interested and engaged.
We’ll talk through a couple of notes on the content types here and then hit them in more detail when we talk about creating your course.
Video is the backbone of your course and what most courses use. I’ve seen a few lower-price courses that just use pdf workbooks and text but by far most use some video component.
That’s a sticking point for a lot of creators because they get hung up on getting in front of the camera. Your videos don’t have to win an Oscar. In fact, some of the best video courses are simply screen shares where you show people exactly how the process looks on computer.
Most courses will also include some kind of a presentation, something as simple as bullet points on a PowerPoint presentation. Another easy content type is just to transcribe your video into text and offer that as a book so people can follow along.
For those of you still camera-shy, I’ve also seen courses that included audio instead of video. It’s tough getting some detail across so you might still consider doing video for that computer screen walk-through.
Lastly here for types of content, and this is a great marketing trick as well, is to offer bonus content. This might even be something you would have included in the course anyway but you can label it as bonus content to let people think you’re offering something for nothing.
Besides just offering extra chapters or videos, some great ideas for bonus content include online communities like a private Facebook group, a weekly group meetup online, recorded interviews or a live Q&A webinar.
These can be included as incentives to get people to buy or work great as upsells after the purchase. Most online course platforms like Teachable will let you direct people after they purchase to a page where you can offer these upsell ideas for ten or twenty bucks more each sale.
One warning here before we cover how to actually start putting your course together is to be careful about over-promising on your course or trading your time for money. For example, offering a private Facebook group means one more think you’ll have to manage.
Selling those weekly mastermind calls is going to mean a few hours each week so just understand what you’re committing to when you design your course and develop that bonus content.
Starting on Your Course
With all that decided, you’re ready to start creating your course, so actually putting together the content.
A lot of this is going to depend on the types of content you’re offering so whether you script out everything or just work from notes. Even if you’re doing video and not offering the text, you might consider writing everything out as a book and then film from that. Not only will this give you a detailed idea of what you want to cover, you can publish the book on Amazon and use it as marketing for the course.
While you’re scripting, make sure you make notes on how you want the video to go. For example, scripting out this video, I’ve got notes in the margin to tell me where I want to include a graphic or a video. This is important for two reasons.

First you can make sure you get all those graphics and other things in your video. You don’t want to have to go back after filming to try remembering where you wanted to show a screenshare of the computer or a image. It also helps to make sure you have some kind of interrupt at least every minute during the videos. That’s a graphic, bullet list, anything that brings the audience back to pay attention and not just zone out for the entire video.
I’ll show you how to use screen capture software in the next section to share your screen as a video but there are a few notes you’ll want to make on filming your videos. You don’t need to spend a lot of money to create your videos. In fact, you can get quality video, lighting and sound for less than $120 on Amazon.
Also, spend an extra 10 minutes to save an hour in your filming. What I’m talking about is reading once more through your script or your notes before you film. Get a good idea for what you want to cover and don’t worry about little flubs. People like talking to a real person when they’re watching a course so don’t worry about little mess-ups or the occasional like or uh. Just these two tips, reading through once and not trying to be perfect are going to save you hours editing your video afterwards.
While you are filming, you want to break your course into manageable chunks of no more than 15 minutes or so. Now I realize the irony here coming from a guy that is recording what will probably be a twenty-minute plus video but I wanted to make a one-stop video for creating your course. When you have a two or three hour course though, break it up into shorter videos that don’t stress your students’ attention span.
Want to start making money blogging? Don’t know how to start? I want to set up your blog and get you started! Find out more here!
Equipment to Create an Online Course
Now let’s talk about what kind of equipment you’ll need to create a course and some of the online platforms you’ll use.
Again, I don’t want you to think you have to spend a lot of money developing your course. You can get everything set up for less than a couple hundred bucks. That includes all your equipment plus some of the platforms you’ll need to deliver and automate the process.
First, let’s cover equipment and this is really just three things you’ll need; a webcam, a lapel mic and a ring light.
For a really high quality webcam, go with this Logitech C920 which is pretty much the standard used by everyone. It gives you quality HD video for less than seventy bucks. This is actually going to be your most expensive piece of equipment but totally worth it.
Now for lighting, understand that you can’t use just your regular room light. Without going into a big photography class, room light bulbs are different from what you need for good video. It’s why sometimes you’ll see a YouTube video where people look yellow, because of the light bulb temperature. For quality lighting that makes you look great, go with a ring light that you can set up over your webcam. Doesn’t need to be expensive, you can get a ring light for less than $60 and it’ll last forever.
One piece that most course creators miss is audio and it’s going to surprise you how much good audio can mean to a course. You won’t get good audio just using the integrated microphone in your laptop or webcam but you can get it cheaply with a lapel mic or a lav mic. For these, no more than $20 can get you a really good sound.
That’s really all the equipment you need. I know it’s surprising but that’s all you need to record your course. You can use a free screen capture software like Screenflow to start out. I use Camtasia which is a couple hundred bucks but that’s only because I use it so often for the channel here and other projects.
That’s it for equipment but I want to cover four platforms you’ll use to deliver and automate your online course. A couple of these will be critical while a couple will just make your sales easier and make more money.
First is Teachable and this one’s a must-have. This is the website that hosts your course and delivers it to students. I’ll show you how to set up your course on Teachable in the next section but this is really an all-in-one resource for your course.
Teachable will collect payments from students, including recurring payments or one-time. You can manage all the students’ questions and comments from the platform, set up sales pages test different marketing. The platform will even allow you to sign up other people to sell your course for a commission as affiliates.
Another platform that’s going to be critical is ConvertKit, an email marketing provider. This is something we talked about in our video series on setting up affiliate buyer funnels for passive income and it’s going to work the same way with your course. With ConvertKit, and we’ll talk about this in our course marketing video next, but you’ll set up a special email list that will help you sell your course. Y
ou’ll also use the service to send out a series of emails after someone buys the course, to guide them through and make sure they stay engaged. The idea here is that you set these email series up once and they go out automatically to anyone that signs up on a specific form. This is how you’re going to set up your course to make it completely passive for cash every month.
Next is you will probably want a basic website or blog to help sell your course. This isn’t a must-have because you could do all your marketing through a YouTube channel but a blog can also be an amazing income source and it’s own asset so I wouldn’t avoid it. Besides, it’s easy and inexpensive to set up a blog.
I negotiated a special rate of just $3 a month on BlueHost, the webhosting you’ll need for your blog, for everyone in the community here.
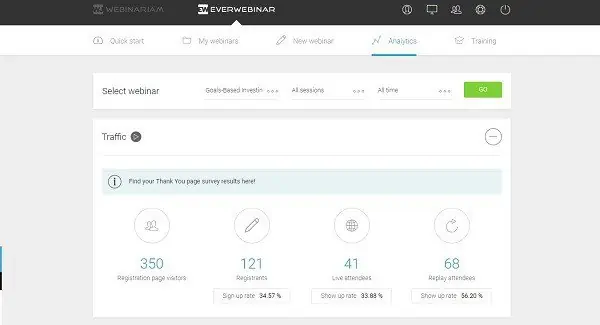
Finally here is a webinar software I use called Everwebinar. This is another nice-to-have and can get pricey at $500 a year so I don’t want you to think you have to start with this or that you can’t make money with a course without it.
With EverWebinar, I can create a webinar that looks like a live event. Basically, I do one live webinar, record it and can replay it to look live anytime someone wants to attend. Where you’ll use this is in that buyer funnel we talked about setting up. The idea here is that you offer this free webinar, something that will give people some real value, as an incentive for people to sign up to your email list.
Once they’re in this email list, you can upsell them into your course as well as putting a sales pitch at the end of your webinar. It’s just a really powerful incentive to get people on your email list and connect with them before you pitch your course. Again, we’ll talk about setting this up and automating it in our marketing video.
Get your blog started in 15 minutes with this special offer from Blue Host! Web hosting under $3 a month – the lowest price anywhere! Get your special rate here.
How to Get Your Course Online
Once you’re ready with all your content, you’ll need to get your course online and price it for sales.
I’ll walk you through getting your course online and setting up Teachable next but want to talk a minute about how much to charge for your course.
I know your ears just pricked up, didn’t they?
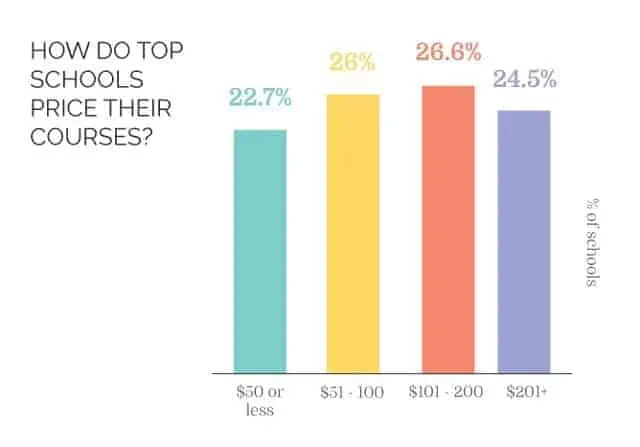
This is probably the biggest mistake I see among new course creators, not charging enough for your course. We talked about this in our first video and I want to repeat it. We see here that more than a quarter of classes charge over $200 and half charge $100 or more.
Create a premium online course and charge a premium for it! What I want everyone to do, think about a price you think you might charge for your course and then double it. You can discount the price down a little for marketing but I wouldn’t consider selling a course for less than $100, my time is worth more than that and so is yours.
Now I’ll show you how to set up your course on Teachable though the platform makes it extremely easy and has some great features we’ll talk about. So you’re here on teachable and you can click to add a course in the left menu. The first thing you’ll see is a screen to name your course and add the instructor’s bio, add a sub-title here, just some basic stuff.
Next is to add your course material and structure. Here a lecture is like a chapter and then you’ll have modules in each lecture. So your course might have five or ten lectures, each of those might have a few modules. Now you don’t necessarily have to structure your course like this, it’s just how most do it.
Adding video files or handouts or just about anything is really easy, just a few clicks or you can drop the file into the box here. You can also add text instructions or notes to each and allow comments on any section in the course. Quizes are a great way to keep your students engaged and show them they’re learning.
Adding new sections or adding new lessons within a section, all pretty easy with just a couple of clicks. I will say that sometimes it takes a bit to upload long video files so if you have a lot of these, don’t wait until just before launching your course to do it. Start the upload process as soon as you have videos done and you can use this Bulk Upload button to do it all then just let it run.
If you ever want a little more detail on a page, there are these help links all over the place and the support section is really thorough. You’ll find posts on everything from creating a course to setting up your class online and even how to market the course.
Next we can click through to price our course and Teachable offers four options. You can go free if you’re using the course as a lead magnet or subscription to get that monthly recurring revenue. For most courses, you’ll select this one-time payment and payment plan option. Again, real simple to just put in your course price here. Giving students the option for a payment plan is always a good strategy so we’ll do a three-month payment option here.
One of my favorite options is to add a coupon code, so a great marketing strategy here. You can have as many different coupons as you like for your course. You can also bundle your courses for a discount price, maybe like a Black Friday special.
And that’s it, you click publish and your course is online. You can put together a sales page directly on Teachable and the platform will collect money and transfer it to you each month.
Now you’ve got a course online, you’re ready to make the big bucks…and suddenly all you hear are crickets.
Anyone with an online course will tell you, it’s all about the marketing. It’s about getting that course in front of the right people, at the right time and making the sale. That’s exactly what I’m going to show you in our next video, how to sell a course and how to make the process completely automated for true passive income.
Don’t forget to click through and get your free checklist for creating a course along with that special report on the 10 critical steps to making passive income on a course. We’ll be talking about that marketing strategy in our next video but you can get that checklist free right now.
Read the Entire Make Money Creating Online Courses Series
- 3 Passive Income Strategies to Sell Courses Online
- 5 Legit Ways How to Make Money Online for Free
- How to Make Money Online from Home [3 Secrets and 5 Easy Jobs]
- $50,000+ Passive Income Creating Online Courses [Step-by-Step]
- 10 Critical Steps to Creating and Making Money with Online Courses